Wood turning is something you can try if you are interested in learning more. These tips will ensure your safety while turning. Follow these rules to avoid common injuries while wood turning. It's not a good idea to get hurt while wood turning. When turning wood, it is important to wear the appropriate clothing. You can find safety tips for wood turning online if you aren't sure how to protect your self.
Safety
Safety is an essential part of any woodturning project, just like any other hobby. Woodturning is safe in most cases, but it does come with risks. To minimize these risks, use safety equipment and common sense. Avoid wearing jewelry or loose clothing, and don't be distracted when working with rotating machinery. This article provides information about some of the most important safety policies for woodturners. Let's take a closer glance.
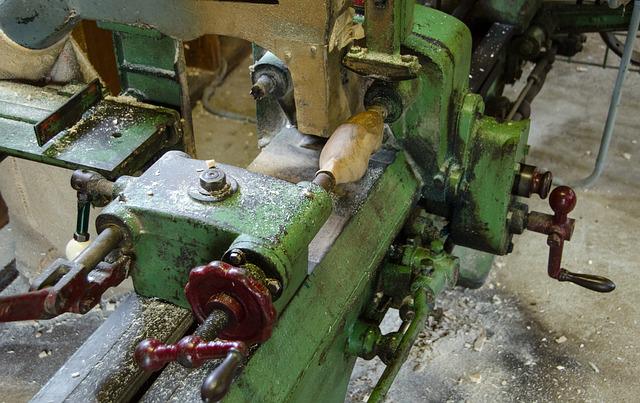
The proper placement of your workpiece onto the lathe is another important consideration. Your workpiece should be at least 15 inches away from the toolrest before you start the lathe. Also, keep in mind that wood dust can cause you to slip if your toolrest is too close. Moreover, if you notice that the live center has become loose, this may be an indication of a loosening.
Tools
A wood turning lathe can be used to turn wooden objects. It has two banjos. Each banjo has a unique function and is essential to the successful working of the lathe. This article discusses each type of banjo and explains how they are used to turn wood. Let's look at the different types of woodturning tools. The article also discusses safety equipment for woodturners. Safety equipment is important to ensure safety while you work.
Steel-toed boots will protect your feet. Wear eye and/or ear protection when handling large objects. It doesn't matter which woodturning tool is used, protecting your eyes and ears against harmful fumes is essential. A good pair of leather steel-toe boots is recommended for all activities in the shop. When turning a blank, woodturning tools can also be useful.
Projects
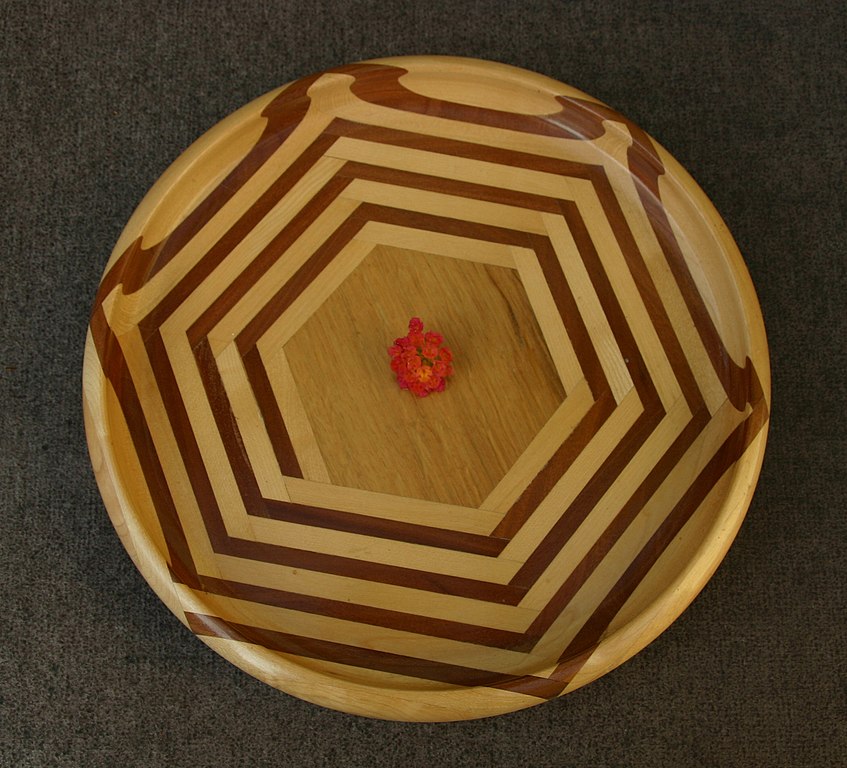
Perhaps you're curious what kind of woodturning projects you could do. First, you must understand the materials you have to work with. The Spruce explains that there are many kinds of hardwoods available. You can also get wood from local tree surgeons or sawmills. Here are some beginner projects. This project involves making a bowl using locally sourced unseasoned timber. It will take some time, but the result will be worth it!
Woodturning is a craft you need patience with, no matter your skill level. Woodturning projects don't require any experience or skill. However, you can make adjustments to suit your preferences and needs. This hobby is also a great way to relieve stress and improve mental clarity. There are numerous resources online that can help you get started. There are many tutorials that will guide you through the process.
Attire
The type of wood turning project you are working with will dictate the appropriate attire. Full-face visors offer greater protection against flying objects than safety goggles. Wearing safety goggles made of steel toes is a good idea if your goal is to grind. It is recommended to use ear and eye protection. You should also wear leather steel-toe boots.
The proper attire for woodturning should consist of a comfy cotton shirt, a turned baseball hat, and high-top sneakers. You should not wear loose clothing if you plan to work on a piece or wood for a long time. Avoid catching any jewelry on the spinning object. Tie your hair back and remove any jewelry. You should also have paper towels handy to blot away wood shavings, which will get everywhere and in some cases, end up on your clothing.
Dust masks

There are many different kinds of dust masks that can be used for wood turning. Many of these masks come with cartridges or filters to reduce dust moisture and heat. You can also purchase pads to place on your nose and mouth. You can place some dust masks over your nose or mouth with rubber or elastic straps. These straps protect you against dust and fumes. A powered mask is an option if you are not able to wear a face mask.
Others wood turners use masks with high levels of filtration. One of these is the 3M 8210 particulate respirator. The 20-piece box contains the respirator, which filters 95% of particulate matter from the air. Dust masks for wood turning are expensive but will protect your lungs. The 3M-8210 comes in a set of 20.
Respirator
You can protect your lungs and face from harmful particles by wearing a respirator while working on your lathe. For woodworking, a powered face mask respirator is an excellent option. Powered masks are perfect for noisy, dusty jobs. Woodturning creates lots of dust and shavings. These can fly at your face. Safety glasses that are standard won't protect you from flying debris or dust will not work. This debris could cause extensive injury if the chuck drops a bowl.
FAQ
Where do I get my woodworking supplies?
You can find everything you need in many places. You could go to your local hardware shop or visit websites such as Amazon.com.
You can also search flea and garage sales for furniture and other materials that can be reused.
How do I get started as a woodworker?
Woodworking is an art form that requires patience and practice. It takes time and practice to master the various techniques and tools required for woodworking.
There are many woodworking tools on the current market. Some prefer to use power tools and others prefer hand tools.
The choice is yours, but you must ensure you choose the right tool for the job. If you don't have any experience, you may consider starting with a basic set of hand tools.
Another option is to learn how to use a router, which is used for cutting intricate shapes into wood. These tools can be purchased at most hardware stores.
What is the average time it takes to finish furniture?
It depends on the type and complexity of your design as well as the amount of finishing that you use. Hardwoods are more difficult to maintain than softwoods. Hardwoods are also more expensive than softwoods. However, they are stronger and more resistant to moisture. Finishing furniture can take anywhere from one week up to three months.
Which woods are good to use for furniture-making?
Woods are classified according their hardness. Softwoods include cedar and pine as well as cedar and cedar. They are great for outdoor furniture as they resist rot. The hardwoods are oak, maple and mahogany. They can't withstand the elements outside so they're best kept indoors.
Statistics
- Average lumber prices rose about 600 percent between April 2020 and May 2021. (familyhandyman.com)
- Most woodworkers agree that lumber moisture needs to be under 10% for building furniture. (woodandshop.com)
- Overall employment of woodworkers is projected to grow 8 percent from 2020 to 2030, about as fast as the average for all occupations. (bls.gov)
- Woodworkers on the lower end of that spectrum, the bottom 10% to be exact, make roughly $24,000 a year, while the top 10% makes $108,000. (zippia.com)
External Links
How To
How to drive a nail through wood
When driving a nail into wood, it is important to first choose the correct size and kind of hammer. The most commonly used types of Hammers are claw hammers. Each type of hammer has its pros and cons. For example, a claw hammer works best when you want to hit something hard, like nails; however, it's difficult to control precisely where the blow lands. A sledgehammer allows you to hit large areas simultaneously, but it is too heavy and cumbersome to use for small tasks.
After choosing the right hammer, place your hand flat against the side of the head so that the handle rests comfortably in your palm. Grab the handle tightly, but do not squeeze too hard. You should hold the hammer straight-up, with your wrist still relaxed. Next, swing the hammer toward the ground and aim for the nail's center. You should feel the impact of the hammer striking the nail. You can practice swinging the hammer with a block or wood until you feel the rhythm.
Hold the hammer near your body until you're ready for the nail to be driven. Place the nail so that it is perpendicular with the wood's surface. Your eyes should be focused on the nail's tip. Swing the hammer forward, and then move the hammerhead. Repeat this action several times, gradually increasing the speed of the swing. After mastering the technique, you can add power to your swings. Then, raise the hammer from your shoulder to bring it down. This will help you put more energy behind each of your moves.
After you have nailed the hole, take the hammer off the nail. Use a pry bar or screwdriver to pull out the rest of the nails. You should ensure that the nails are flush with the board's surface to avoid splitting the wood.