
Most likely, you've seen fretwork in Victorian homes. You can still see the graceful interlacing design and intricate woodworking techniques from this period. This sourcebook includes elaborate plates that include authentic patterns for fretwork and finials as well as banisters, scrollwork, interlaced vines and foral carvings. The book offers detailed instructions about how to prepare your Scroll Saw for fretwork.
Creating victorian fretwork patterns
The timeless fretwork pattern is a great choice for any home, whether you are making a Victorian-inspired table, window treatment or screen. This guide includes full-size shaded patterns and detailed instructions. Close-up photos of vintage pieces are also included. The patterns are extremely popular today, and can now be found on everything from bedding to rugs. Not only can fretwork patterns be used on tables and cabinets but they also add an elegant touch in any room.
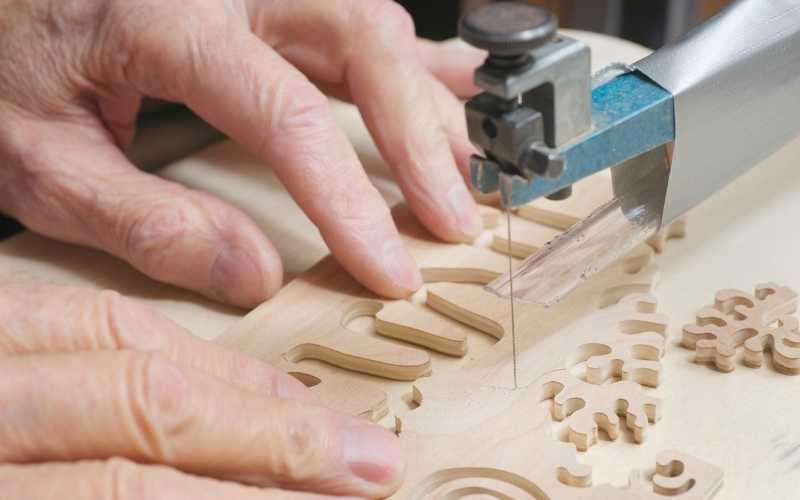
Preparing the scrollsaw for fretwork
It can seem daunting to begin fretwork if you are a beginner in woodworking. However, once you have the right tools, the process is quite straightforward. Traditionally, this type work was done with handsaws. However scroll saws made it easier. Scroll saws can have their blade removed so that you can cut different patterns out of wood sheets and panels.
First, prepare the scrollsaw. Drill starter holes. Starter holes are located at a quarter inch distance from the inside edge of the scroll saw. To drill these holes, use a 5mm drill bits. Once you've drilled the starter holes, you'll be ready to cut the wood pieces.
Once you've made sure your scroll saw's blade is sharp enough to cut the correct size and shape, you're ready to begin carving. Marquetry involves the application of different wood veneers to a wood surface. Marquetry, which is considered an artistic form of woodworking, requires a skilled craftsman. Beginners should not be intimidated by this type of woodworking, though; you can use a scroll saw to create stunning pieces for home and office.
Making a Victoria Fretwork Cross
You've probably heard of fretwork before, but have you ever considered making your own Victoria Fretwork Cross? These cross-shaped ornaments look beautiful when framed or displayed in a sunny window. These easy-to make projects have stunning curves and scrolls. These projects are easy to put together. Wood veneer is a reliable and affordable option. There are many types of fretwork patterns, including whimsical and geometric patterns.
A basic Victoria fretwork crossed can be made out of parchment paper. However it must be bendable in the way shown. You should taper the masts to the top and point each cross spar at the end. To cut your pieces, use a fretsaw. Then paint them. You should finish your piece by adding a red cross to help you identify it. Be sure to carefully follow the instructions.
FAQ
Do I need to be a genius to succeed in woodworking?
No. Woodworking is not rocket science. Anyone can learn to use basic powertools and techniques to create beautiful work of art.
What should a woodworker be paid per hour?
Hourly rates for professional woodworkers vary depending on many factors such as skill, experience, availability, geographical location, and other variables.
An average hourly rate for skilled woodworkers ranges between $20-$50.
A woodworker with less experience may be able to charge $10 an hour.
How much money do you need to get going?
There are no exact numbers because every project is different. Here are some factors to help you estimate how much money you will need.
-
Material costs
-
Tools and equipment
-
The time spent on the project
-
The hourly rate
-
What is your expectation for profit?
-
You can hire help, regardless of whether you have a plan.
It's a good idea for beginners to start with small projects like frames and boxes. As you gain experience, you'll be able to tackle more complex projects.
Do I have to refinish my furniture?
Yes! There are many different ways to refinish older furniture without the need for professional help. Here are a few ideas:
Use sandpaper to remove scratches and stains. Finally, use a clean cloth or sponge to clean the surface.
Apply clear polyurethane varnish. Allow to dry completely before moving furniture.
Use acrylic paint to paint furniture.
You can stain the furniture instead of using paint. The furniture will get a rich look with the stain.
Shellac wax is applied. Wax will protect the wood and add shine.
How can a beginning woodworker make a living?
Many people are starting to learn how to build furniture because they want to start an online business. You don't have to sell on Etsy if your furniture is just beginning. Local craft fairs and events are great places to sell your products. You could also offer workshops to help others learn how to make their own furniture. You might be able to offer services like remodeling homes or making custom pieces for clients if you are a skilled carpenter.
Is it possible to open my own woodworking shop?
It is difficult to start your own woodworking company. You will need to adhere to many legal requirements. But, this doesn't mean you need to go through all of the trouble of setting up your business. Many people choose to join existing businesses. This way, you only need to pay membership fees and taxes.
Statistics
- Most woodworkers agree that lumber moisture needs to be under 10% for building furniture. (woodandshop.com)
- In 2014, there were just over 237,000 jobs for all woodworkers, with other wood product manufacturing employing 23 percent; wood kitchen cabinets and countertop manufacturing employing 21 percent. (theartcareerproject.com)
- The U.S. Bureau of Labor Statistics (BLS) estimates that the number of jobs for woodworkers will decline by 4% between 2019 and 2029. (indeed.com)
- If your lumber isn't as dry as you would like when you purchase it (over 22% in Glen Huey's opinion…probably over 10-15% in my opinion), then it's a good idea to let it acclimate to your workshop for a couple of weeks. (woodandshop.com)
External Links
How To
How to stain hardwood
The process of staining wood involves the application of chemicals to the wood's surface, which causes it to change its color. This chemical reaction causes the wood to change from white to brownish red. Although oak is the most popular type of wood to stain, there are many other types that can be used.
There are several ways to apply stains to wood surfaces. One method involves mixing the stain and a solvent and then spraying it on the wood. You can also apply a solution containing water and dye directly to the wooden surface. It is possible to mix stain into varnishes and paints, making it part of the finishing coat.
Preparing the wood surface is the first step to staining it. To apply the stain, clean the wood completely. Sanding smoothens any scratches or rough spots. The next step is to choose the stain type you want. Penetrating stains are different from non-penetrating. Penetrating stains penetrate deeper into the wood than non-penetrating ones, making them ideal for dark colors such as mahogany. Non-penetrating oils work best when used with light colors, like maple.
You will need to decide on the type of stain you want to use, and then prepare your tools. The best tool for applying stains is a paintbrush. It allows you to evenly distribute the liquid over the surface. To remove any stains left behind after painting, you will need some rags. You should have enough containers to store the various components of the stain mixture if you intend to mix it yourself.
Once you have prepared your materials, start by cleaning the area where you plan to stain the wood. Use warm water and soap to clean away dirt and dust. Wipe down all furniture pieces with a dampened cloth and clean water. Take care to remove all debris and dirt, especially if you are planning on staining darker wood.
The stain should be applied next. Start at one end of the piece of furniture and brush or spray the stain onto the wood. You should work slowly and carefully. Continue moving along the grain until you reach your opposite end. You must be careful not to allow the stain to drip off the wood's edges. Allow the stain to dry completely before you move on to the next step.
Clear polyurethane is used to protect the painted surfaces. Three coats of polyurethane sealing agent are required. Allow the third coat to dry overnight before sanding the final coat.